Building a Garden Railroad
Part 1, Power and Water
Digging Pond, Waterfall and Streambed
With the preliminary planning and layout all done, we were finally ready to commence actual construction on 9 October. Varying slightly from plan right off the bat, I started digging the pond. I knew this was going to be the toughest back breaking part so I wanted to get the bulk of it out of the way. I also knew where the power feed would run and therefore, knew that where I was piling the soil I excavated from the pond would not interfere with power installation on a later day. I dug on the pond for four hours the first day and only had the pond to about half the planned depth (planning a 3 foot depth in the deepest part of the pond). I was tired though.
On 10 Oct, I put in another four hours digging on the pond and ended the day with it done except for perhaps a little fine grading and cleaning out. I didn't end up with it as deep as I originally planned. I modified the depth to 30" instead of 36". I began to think that that last 6" of depth would not be worth the liklihood of a heart attack. :)
In the evenings during the days I was digging, I researched and ordered the pump I decided to use. I decided on a SUPREME PONDMASTER HY DRIVE 4800 GPH WATERFALL PUMP ($222), Pondmaster Bio-Matrix Pressurized Filter, P-4000 ($350) that had the capacity to match the pump's output and all the appurtenant piping and fittings required to make it all work together. I wanted a good strong flow in the waterfall. Since the level of the pump intake was going to be about five feet below the top of the waterfall, the chosen pump, according the table of output for it, would produce about 3000 gph against that static head. When I ordered the pump, I also ordered a piece of pond liner that I found on ebay at a good price.
Installing Power Feeder
I got started early on 11 October pursuing the installation of the 120-volt power feed to the site. I had estimated my total needed distance of run for the power to be 96 feet from the point where I tied into existing to a point within 20' of the pond excavation. I went to my local Lowe's and bought a 100 foot roll of UF cable. UF is suitable for direct burial so that saves running a conduit to the site. The point from which I was tying into existing power was already about 150 feet from the house and I was extending it another 100'. That means I will have some voltage drop in the line. To minimize this voltage drop to an acceptable level, I bought cable with 2-#10 conductors plus the bare ground wire. If you don't have knowledge of voltage drops and such, I recommend you hire an electrician for this work, or get a friend with the knowledge to help you. After purchasing the cable, I stopped on the way home and rented a walk-behind trencher. I have used them before and was well aware that it was like riding a bucking bronco at times but it is still a lot less work that trying to dig 100' of trench by hand.
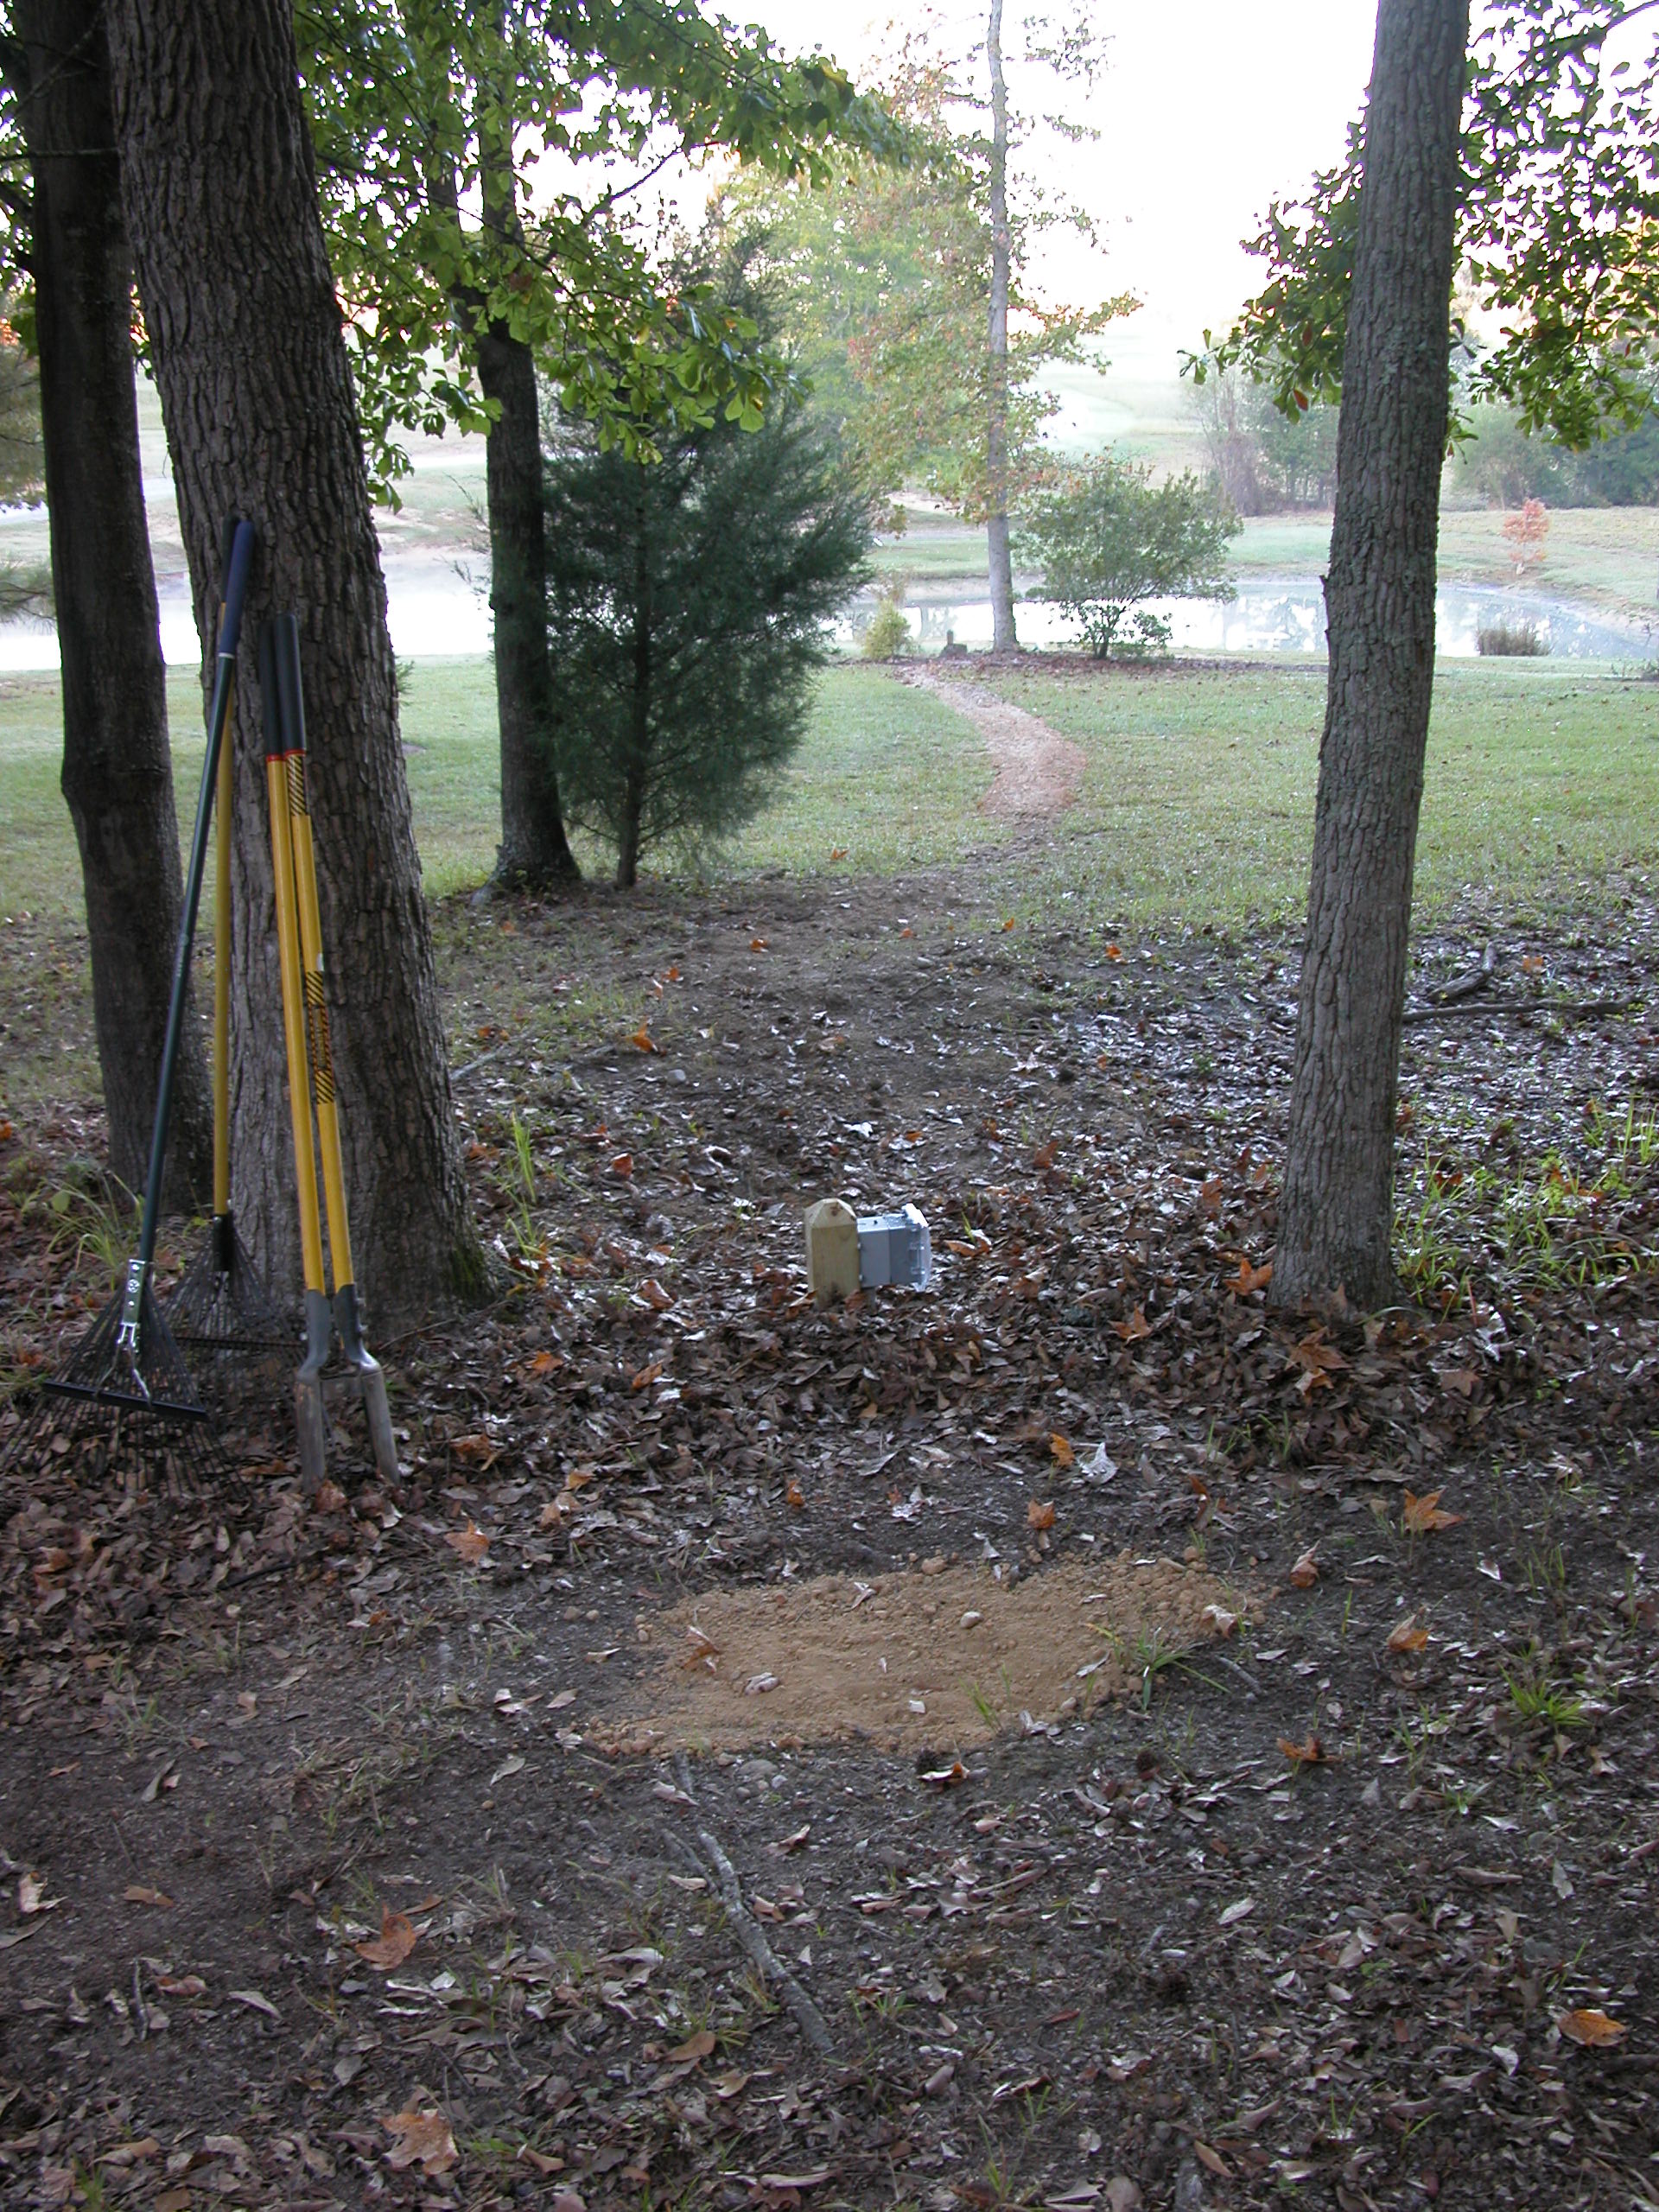 The trencher conveniently comes on a trailer that easily hooks to the trailer hitch on my pickup truck (doesn't everybody in Alabama drive a pickup?). These began the expenses of the project -- the UF cable cost me about $120 and trencher rental for 1/2 day was a total of $154. So, $274 spent just getting the power to the site. Everything progressed pretty smoothly so I was able to get the bulk of the work done in the one day. By end of day when it started misting rain, I had placed the wire in the trench and backfilled it all except a short distance on each end. I would finish the backfill later when I had hooked up the wiring on both ends. The next day, 12 October, I was able to hook up both ends and completely finish the power supply part of the project. I now had a nice duplex 120-volt, GFCI receptable with weather resistant cover mounted on a short 4x4 post, only 10' from the pond, well within the length of the pump cord.
The next day, 13 October, it rained most of the day so I took the opportunity to see about ordering a train. I didn't know of any local place to buy G-Gauge stuff and I often like to buy online anyway since you can usually get a better price. I looked at various different styles of locomotives and my wife and I both agreed that the steam locomotives from the late 1800's suited our tastes the best. And, I soon saw that if I intended to minimize costs, the train set would need to be Bachmann. In particular, a Bachmann "Mountaineer" set caught our eye as visually appealing and the price was suitable at $225 from Charles Ro in Massachusetts. This purchase along with several others recently have given me fairly extensive experience with dealing with online train sellers. See my train sellers page for information about the various ones I researched and used. I also ordered some extra track at the same time. However, I did not have much knowledge of the various track types at the time and was still learning about appropriate materials for track to be used outdoors as well as appropriate radius of track.
Installing Liner in Stream and Waterfall
 By Friday, 14 October, the rain had ended and I was able to return to digging. Now I was digging the stream and waterfall area. The stream and waterfall digging volume was not nearly as much as was involved in digging the pond so I dug myself out of a job in about 1/2 day. I decided I could go ahead and start on the paving of the streambed with concrete. However, my pond liner material I ordered had not yet been delivered and I knew I was going to need more than the one piece I ordered anyway (I intended to put liner under the concrete). So I spent the rest of the day scrounging pond liner material. My local Lowe's and Home Depot did not carry the 50 mil pond liner. After calling around a lot I finally found a supplier in Montgomery that had 10' wide, 50 mil liner in stock for $9.25 per linear foot. I figured I needed 15' to line the waterfall area and the stream bed. So that was another $150 including sales tax. By the time I got back home, the filter I ordered had been delivered as well as hose and fittings to hook it up. I dug a hole to set the filter can in and then installed the pipe from the pond where the pump would be up to the filter. At this point I felt I was far enough along to take my first progress photos.
 On 15 October I did some final grading and cleanup of the streambed and waterfall area, then placed the pondliner in the waterfall and of the streambed only. I still didn't have the larger piece of liner to be used for the pond itself yet. I made sure to allow a liberal amount of overlap between the pieces I used on the streambed and waterfall and that there was plenty of slope at the point of overlap to prevent water from migrating back under the lap and leaking. The pond liner was easy to cut with regular sissors. After getting all the pieces in place for the waterfall area and streambed, I used a water hose to first fill the waterfall splash pool and then more to allow it to run down the stream to check for good flow down the slope and assure that it didn't back up and run out somewhere. It checked out good. The water that ran down the stream ponded (no pun intended) in the pond but by the next day it had percolated down and the pond was dry again.
Paving the Streambed with Concrete
By 16 October I was ready to start placing concrete on the bottom and sides of the streambed. I estimated that one bag of saccrete will pave about 2'-3' of length of the stream. The stream was a total of about 20 feet long so I trekked off to Lowe's and bought 10 bags of saccrete. Saccrete is relatively inexpensive when you don't have a lot of volume to place. I was only placing the concrete about 2" thick and a total width of about 3'. At about $3.50/bag, this wasn't a big expense.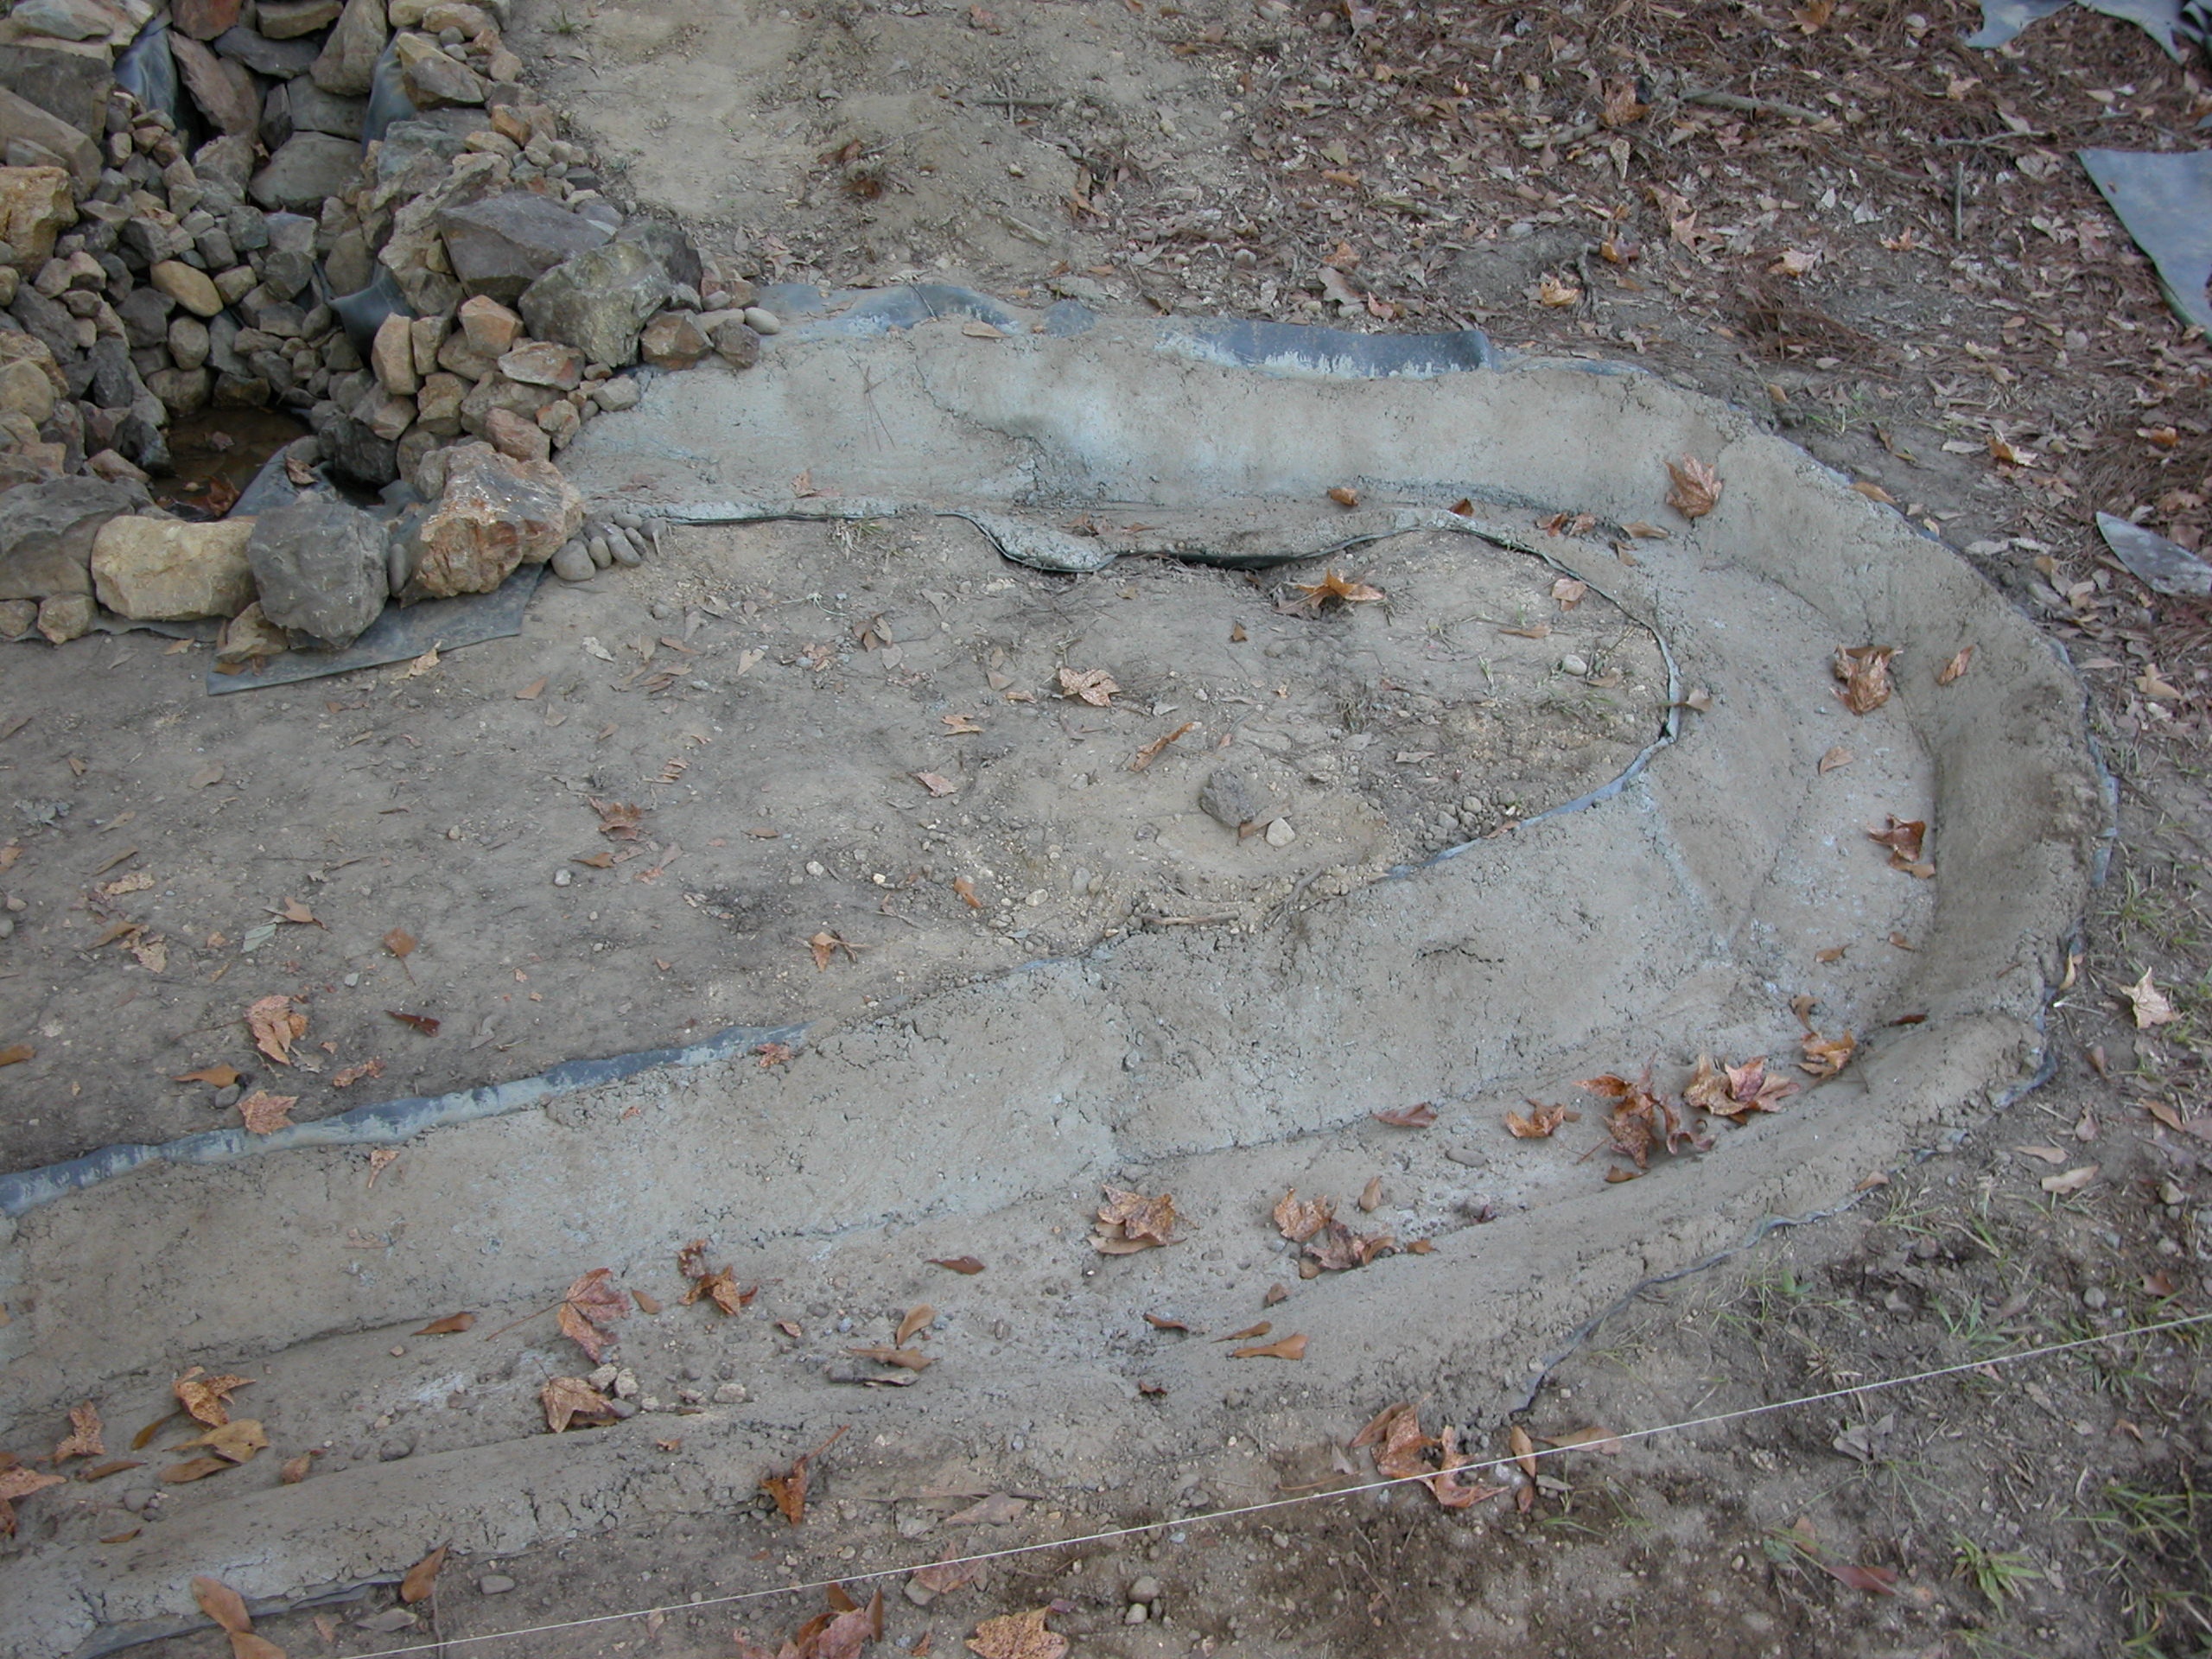 I spread the concrete onto the pond liner using a regular masons trowel. I mixed the concrete stiff enough (didn't add too much water) so that it would remain on the slopes without running down into the bottom. This operation went a little easier and better than I feared it might. I only mixed one bag of saccrete at a time and had plenty of time to place it and smooth to the shape of the streambed before it started to set. Once I had a section smoothed to my satisfaction, I used some natural dirt from the area to sprinkle on top of the concrete. This helped to blend the color in to make it appear more natural. Had I just left it with no coloring, the stark white/gray color of the cured concrete would have stood out from the environment too much and would have looked unnatural. The natural dirt material from the site has some small pebbles in it also, further contributing to the blending of the surface of the concrete. You can see from the picture that I also trimmed the pond liner back to very near the edge of the completed concrete. I later spread a little existing dirt on the exposed edge, covering any remaining visible liner. We also at this point placed natural stones in the waterfall bottom and sides. I selected a nice flat stone for the water to flow over at the top. We are fortunate that in our area these stones are available on roadsides and in neighbors yards so there was no expense there.
Placing Pond Liner
This step was a piece of cake. The last piece of pond liner that I ordered was delivered on schedule on 18 October. Before the end of the day, we had it in place and were filling the pond with water.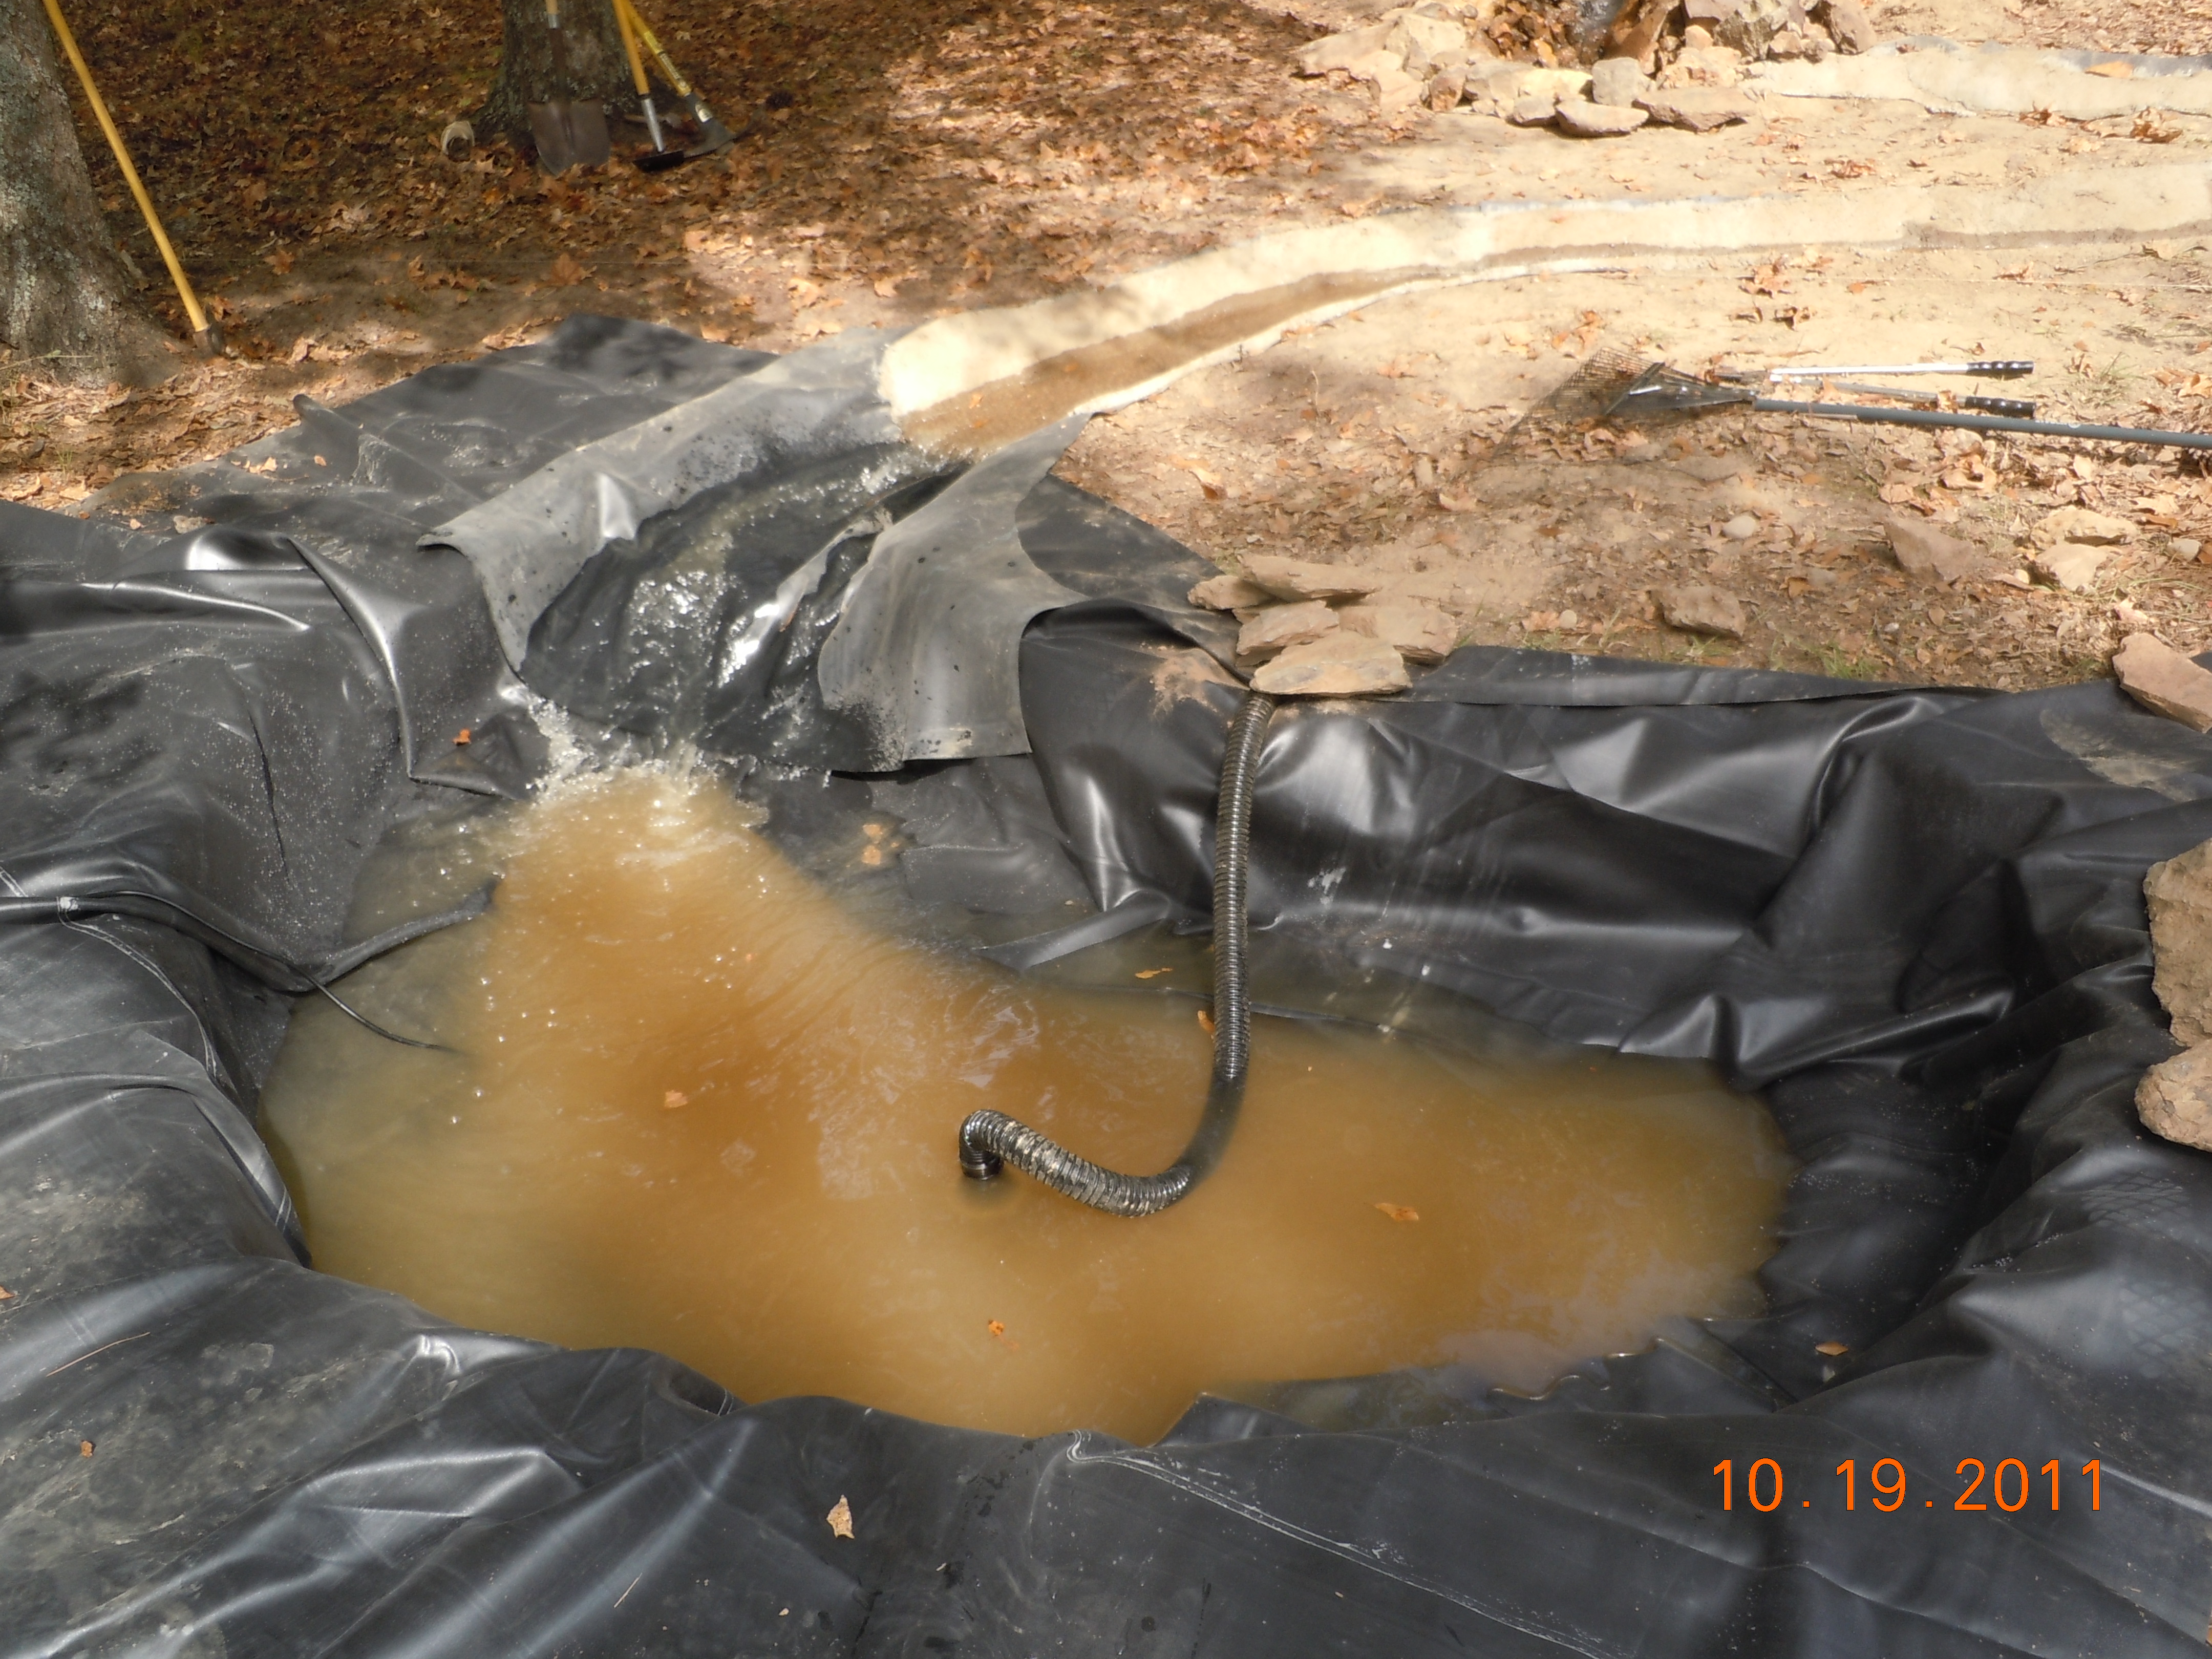 This piece of pond liner was 10' wide and 15' long. It covered the pond very well with plenty of excess. We left all the excess in place until well after the pond had been completely filled to assure that the liner had pulled into all the irregularities of the pond bottom and sides. The weight of the water will wrinkle the liner at curves and turns, conforming it to the pond walls and bottom. Also, we thought to leave some excess of the liner around the outside of the pond where we planned to place stone to help hold the liner in place and assure a sort of margin to keep the water in the pond. Even as we were finishing the filling of the pond with a water hose from a nearby faucet, I turned on the pump to see what sort of flow we would get with the pump. I had been anxious to see the pump in action ever since I had ordered it. I thought it was going to provide plenty of flow, there is no substitute for seeing it action to confirm how it will perform. It did beautifully!
 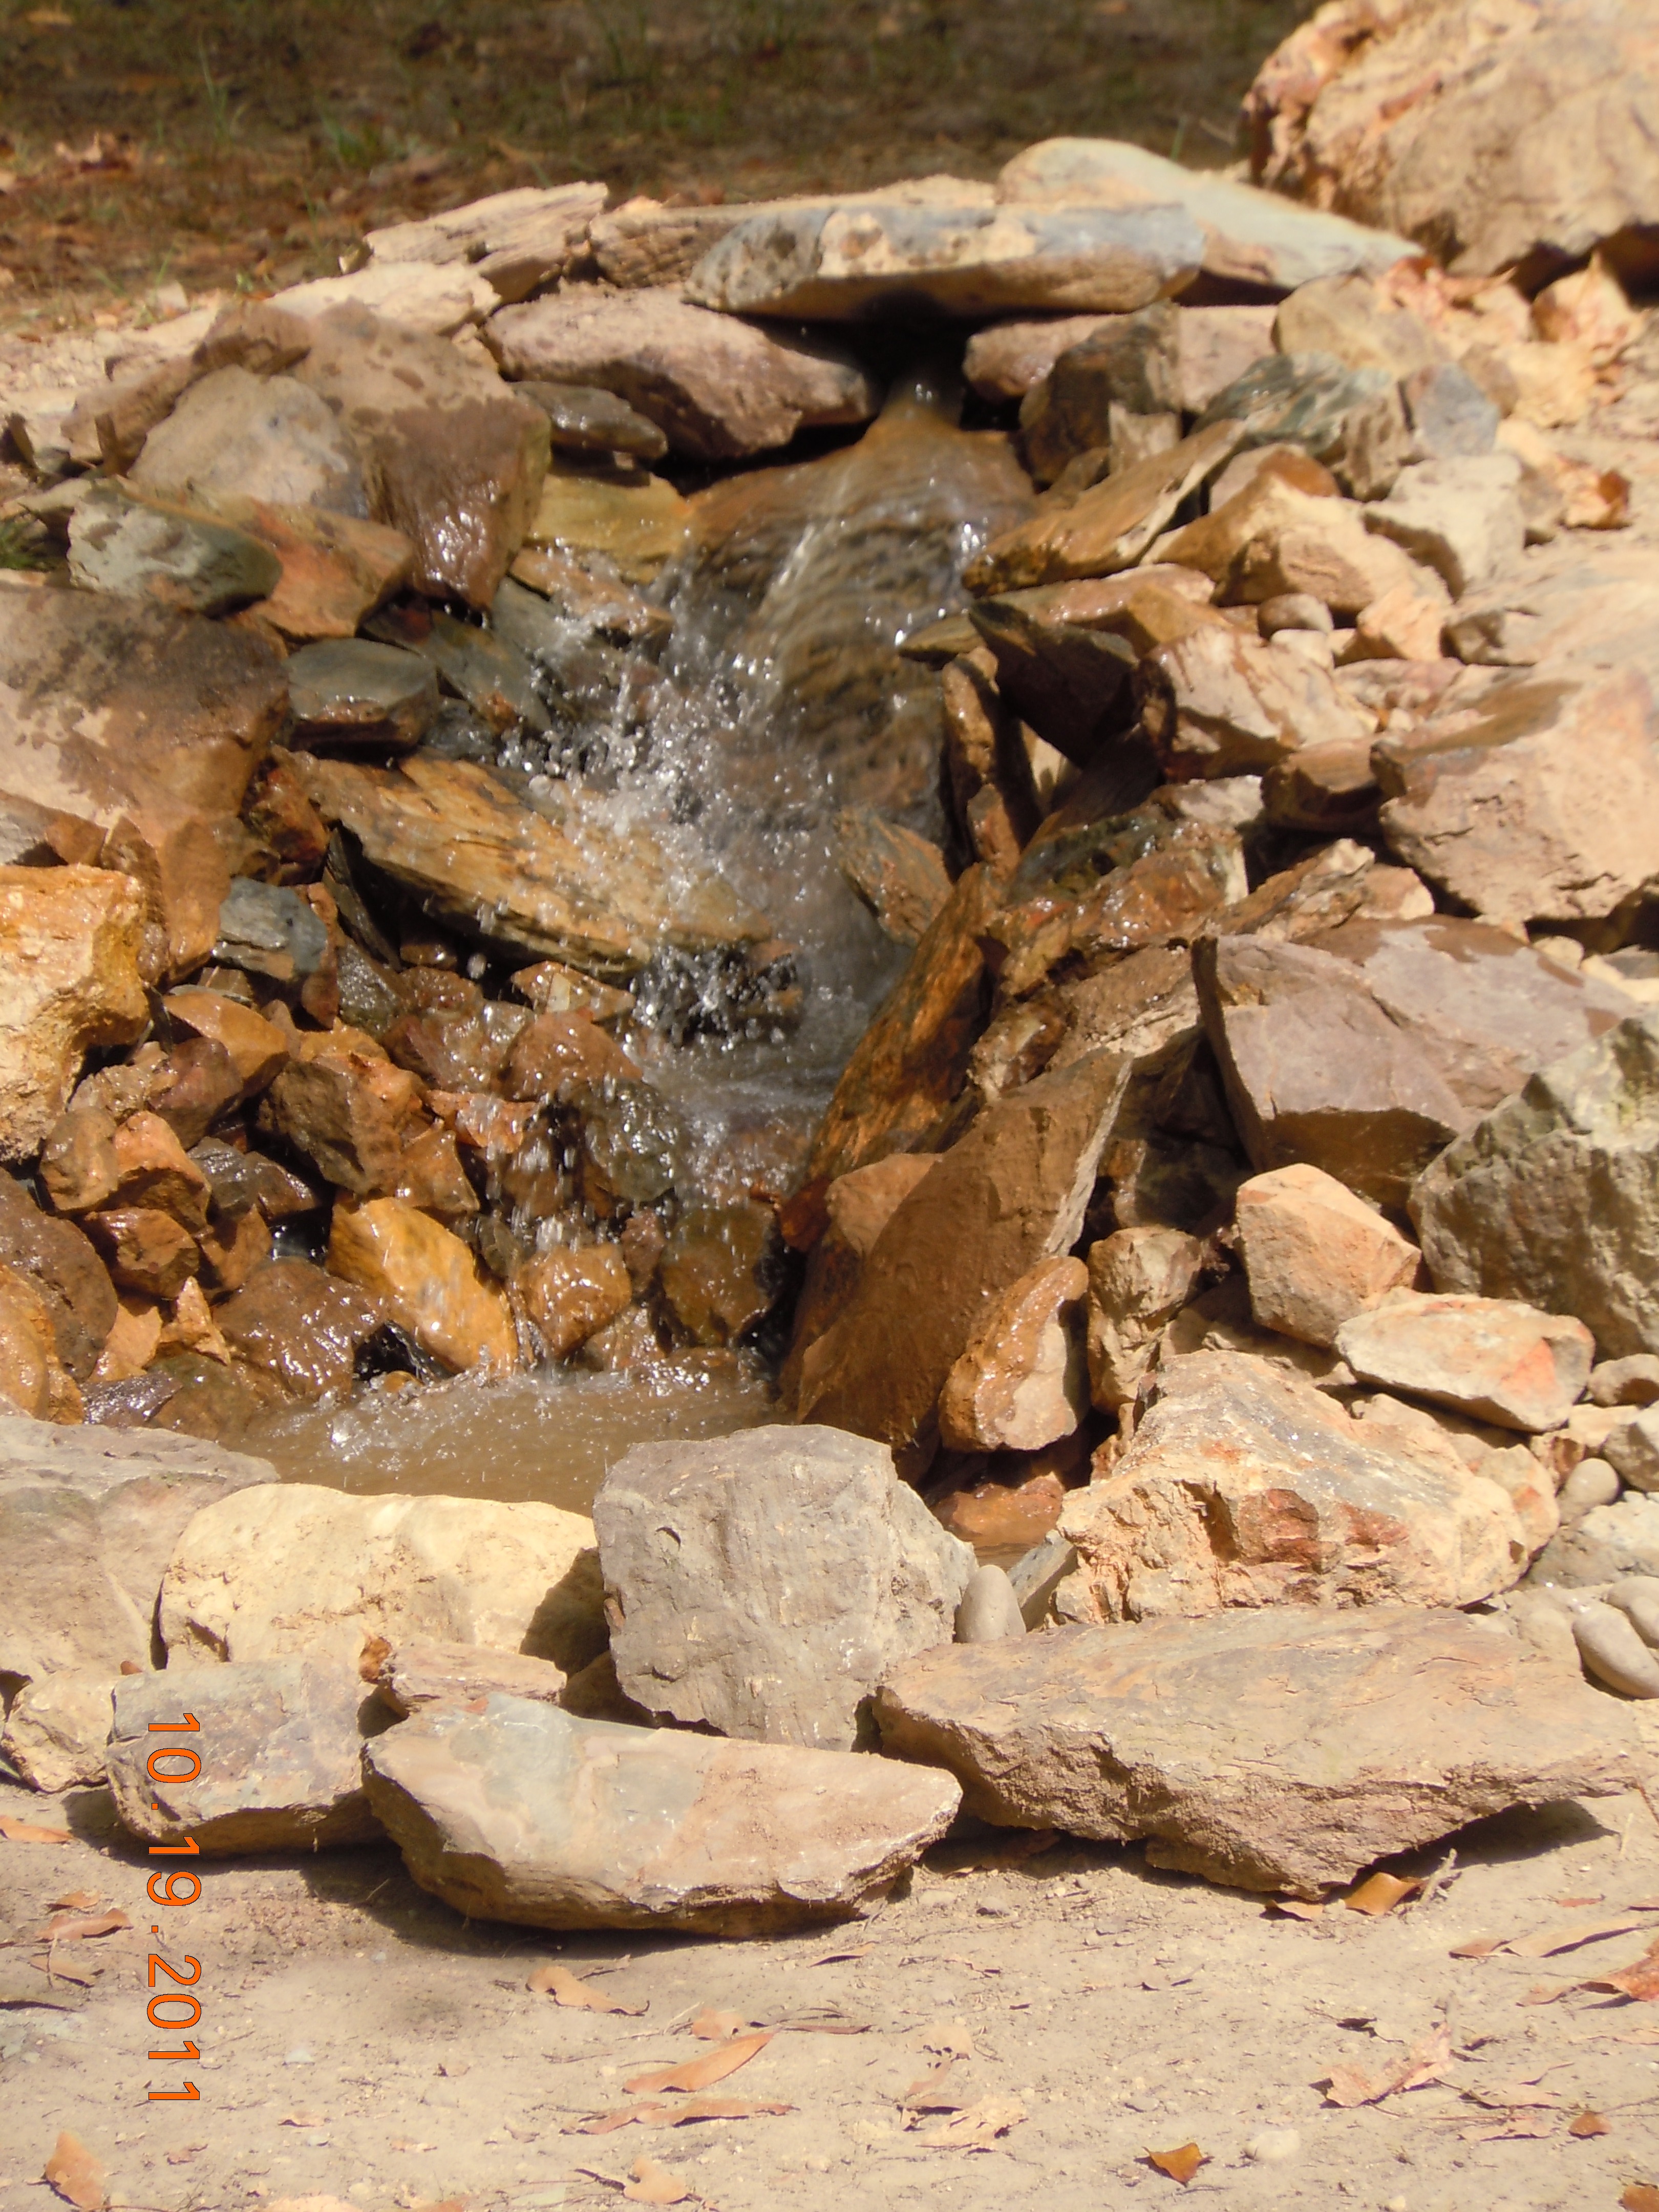 The flow at the waterfall came over in a nice sheet about ten inches wide and splashed into the splash pool, just as intended. There was a good healthy flow down the stream to the pond. Any doubts I had about the capacity of the pump, pumping up against a five foot static head, were dispelled. I was well pleased with the performance.
Once the pond was almost full, only a few steps remained to finishing it up and putting it permanently in operation. We had to scrap up a lot more rocks to go all around the perimeter of the pond as well as a few on the sides and bottom to cover the pond liner and provide a natural appearance. We made several loads in my pickup from roadsides and from a niece's property where she wanted to get rid of as many as possible. Also, there was one final short section of streambed concrete to be placed. This last part could not be placed until after the pond liner had been installed because the pond liner had to be overlapped by the stream liner. Now that the pond liner was in place and positioned with the stream liner overlapping into the pond, the concrete could be finished. Again, this was easily done as I had become experienced in this operation.
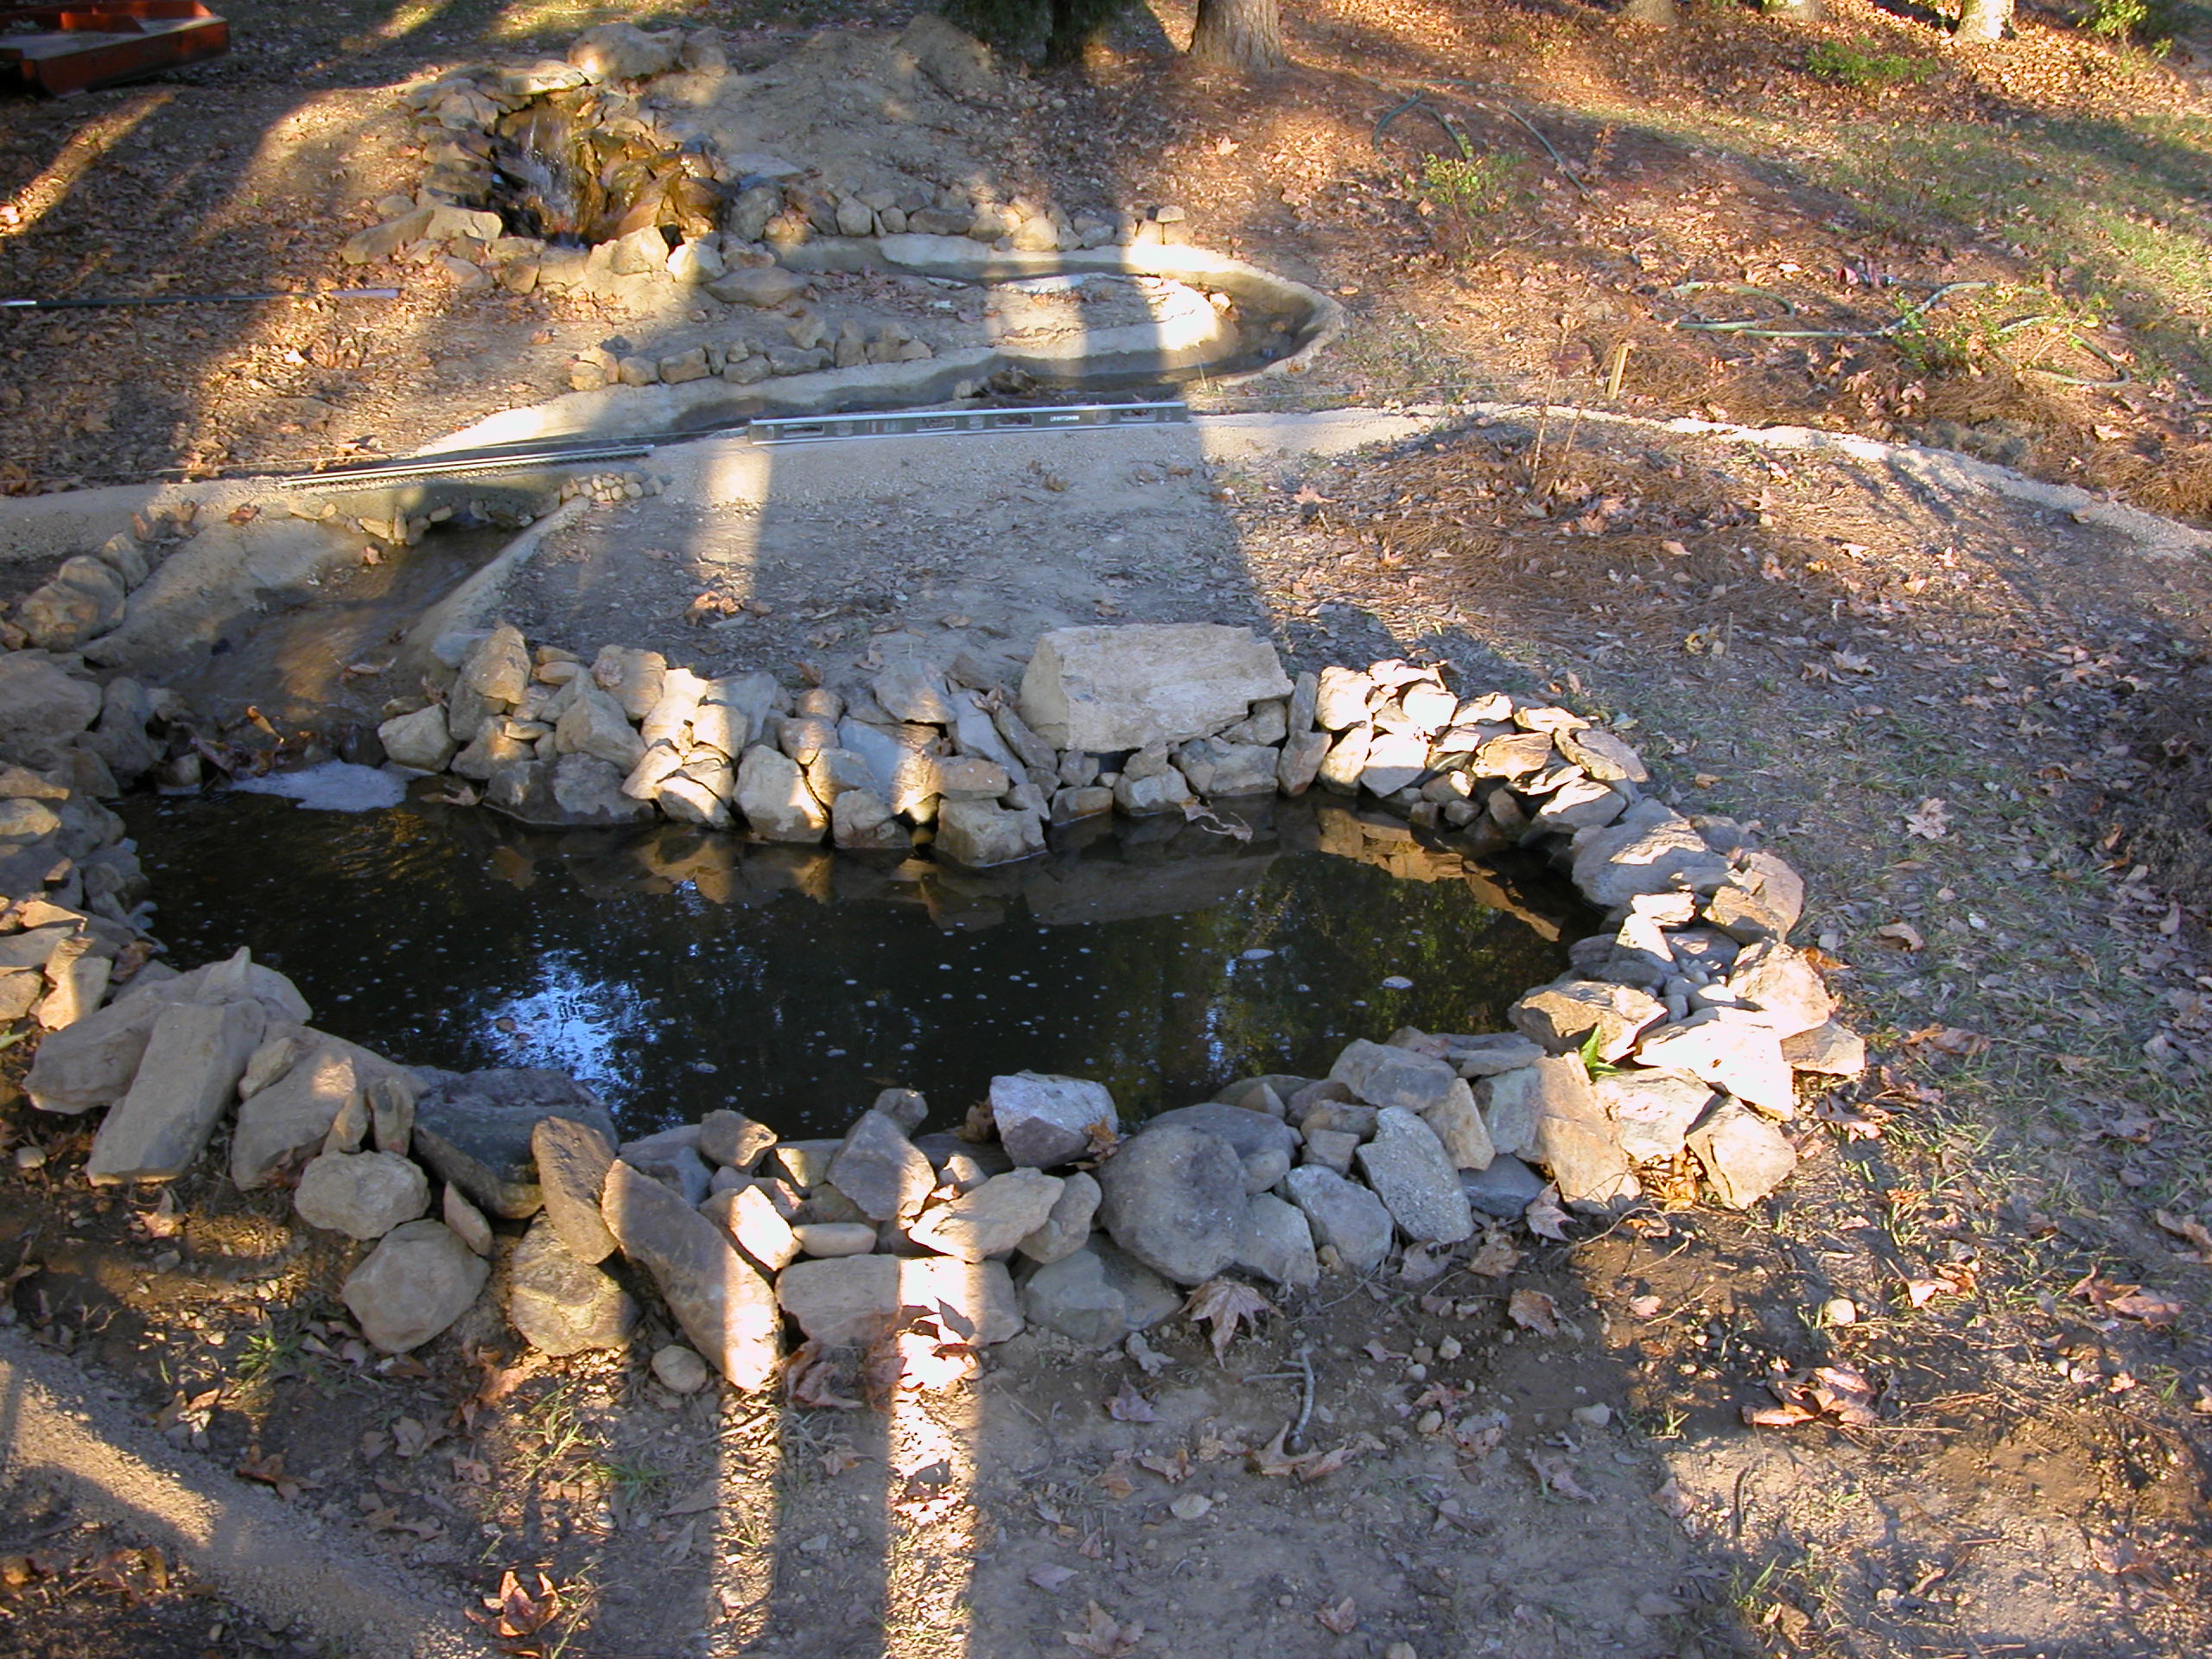 Once the concrete was done, all the stones were placed around the pond and stream, excess soil from the excavation was cleaned up and final dressing around the edges was done, it was time to admire our work. It was a good looking product and a good stopping point to take a break from the project for a few days.
In this final photo for this phase, we have begun marking the routing of the track but have not yet begun to actually lay any track.
You also can see in this photo, the completed concrete bridge across the stream. It was a little tricky forming the concrete for this bridge but it turned out pretty well. I formed the bridge using plywood for the sides and a piece of galvanized sheet metal to form an arch underneath. I placed some small stones on the inside of the form so that they would show on the final product. I stripped the forms soon after the concrete set to make sure the form didn't get hung up or permanently stuck to the concrete. Next step -- building the railroad, part 2, the track. (finally)