Technical Tips for the Ungifted
(Like Me)
The Problem: The Gandy Dancer car has only four wheels making contact with the track, therefore, it spits and sputters.
The Solution: Get more wheels picking up power for the motor. I got this solution from George Schreyer's tips, linked elsewhere on this site. I made a few deviations from George's details but the result was roughly the same. Of course, my work wasn't as neat as George's but he seems to be especially talented. I also made a curious discovery in exploring this upgrade. Bachmann made a significant change in the configuration of the car/trailer sometime in the last several years.
Discussion:My first Bachmann hand car/trailer set was purchased by low bid on Ebay (I do a lot of that). I got it on a low bid of $46. The second set I bought from Ebay also, but this one was new, still in the new box, never opened. Strangely, I paid $46 for it too. Upon examining the two, I found that the older model was better when it comes to electrical contact.
 In the photo comparing the two, the new one is in the foreground. Since they are both yellow, one might think they are the same model but, nay, not so. Notice an obvious way to tell the difference is, curiously, the man in the brown coat and hat sitting on the trailer is sitting on the tongue end of the trailer on the newer model but he is on the back end on the older one. Don't be confused by the tools on the two trailers. The tools were exactly the same between teh two models. It's jus that I have the tools on the older trailer but I haven't mounted them on the new trailer when this photo was taken.
Anyway, the difference that I want to get to here is the electrical pickup. The older model comes from the factory with electrical connection from the trailer to the hand car, and it is a substantial, ingenious connection. It has metal brackets on the axles of the trailer connected through a spring connection to a bar on the tongue. This system soundly connects all four wheels on the trailer together to the bar on the tongue. The connection of the tongue bar to the hand car is the ingenious part.

The trailer hitch picture is worth a thousand words. Don't pay any attention to the ugly attachment of black and red wires on the trailer tongue, I'll cover that later. Just notice the hitch itself. The cross-peg through the hitch is metal, connected with a hidden wire vertically up from the hitch to the electrical system of the hand car. This cross peg picks up a connection from the metal bar on the bottom of the tongue which is connected only to the wheels on the right side of the trailer. There is another bar on the tongue connected to the wheels on the left side of the trailer. Both metal bars run through the tongue but they are separated (insulated) by a plastic strip between the two. The bar from the left side of the trailer connects electrically on the top of the tongue at the hitch by a spring contact that makes connection to the motor.Why didn't Bachmann stick with this clever method of electrically connecting the wheels of the trailer with the handcar, thus giving it eight wheels seeking contact for the motor? I don't know the answer to that one unless it was a cost cutting measure. It makes the trailer much cheaper to make.
So, my old version of the Bachmann Handcar was making better electrical connection than the new one. I had to remedy that -- it's not good for old things to have a better system than new things. It might cause some sort of tear in the continuum of time or something. So, I decided to apply the Schreyer upgrade to the new trailer. But further, I wanted to be able to interchange the trailers and get eight-wheel electrical contact with either trailer on the new handcar, and maybe even the old version handcar too (that's just the ungifted part of me speaking). So, I had four cases:
a. Old Trailer to New Handcar: I actually did the fix to the new handcar to allow it to work with the old trailer first. I did this at that time because of other reasons (see handcar gearing tip) that had me questioning whether I would ever actually run the old handcar, but I didn't want the ingenious trailer connection to go to waste. So, I fixed up the old version trailer to work with the new version handcar. I didn't take a photo of the inside of the new handcar but the work there was pretty simple. I just used an end terminal on a wire attached at the existing screw on each side of the hitch end of the car. I ran the two wires out the back in a little notch I cut in the plastic of the handcar. The two wires were attached to the male half of a plug-in connector that you can see in the photo. This is where I differed from Schreyer's method. He left the two wires individual and had a pin type connector for each one. I didn't have pin type connectors at the time so I used what I had. My next issue on this fix was to get the female part of a plug-in connector attached to the two bars running in the tongue of the old version trailer. I used my trusty soldering iron to make that connection which is clearly visible in the photo.
b. New trailer to New Handcar: Refer more aptly to the Schreyer upgrade this time.  I used the 12.5 mil phosphor bronze wires on the new trailer, stuck in place with CA glue. Incidentally there really is a type of glue called "CA" which stands for cyanoacrylate. I glued a phosphor wire in place, making certain it was contacting the metal part of the axle, front and rear, on both sides. Then I soldered the end of a wire from a pigtail of a female half of a plug-in connector to each of the bronze phosphor wires, only after routing the wires under the front axle. It took a little bit of finagling to get the wire under the axle. I also taped the pigtail in place near the front of the tongue with electrical tape. I didn't have any tiny zip ties like Schreyer used so I went for the ungifted approach of electrical tape. The tape and the routing under the front trailer axle held the wire in place while I soldered them. I never was much good at soldering so my joints are always a little sloppy but they work. That got the trailer ready to connect through a plug-in connector. I had already upgraded the new handcar for connection in "a." above so no additional work was required on the new handcar. I just plugged it in to the male connector hanging out the back of the new handcar.
c. Old Trailer to Old Handcar: This is the configuration from the factory on the old set. Since I left the old system in place on the old trailer, it would still connect electrically to the old handcar, if the need arose.
d. New Trailer to Old Handcar: I had upgraded the new trailer with a female plug-in connector, but I had no plug-in male connector on the old handcar. I decided that the chances of needing this case were two -- slim and none. So, I decided it wasn't worth unscrewing the screws on the bottom side of the old handcar anymore. I had already just about worn out the screws on the old version handcar doing the gear upgrade. But if you really wanted to provide for that case, you can do the same thing to the old handcar that I did to the new one in "a." above.
The Problem: Gandy Dancer Gears Split
The Solution: The same older model hand car/trailer set discussed above on which I did the electrical power pickup upgrade, also had another trouble. When I bid for this one on Ebay, the description rightfully disclosed that it was a used set but it also stated that it was operating and in good shape when stored a few years ago. The $46 I paid for it was a rather high price for me since I usually go cheap, especially for used stuff. So, I was somewhat chagrinned when I got it home and tried it out.
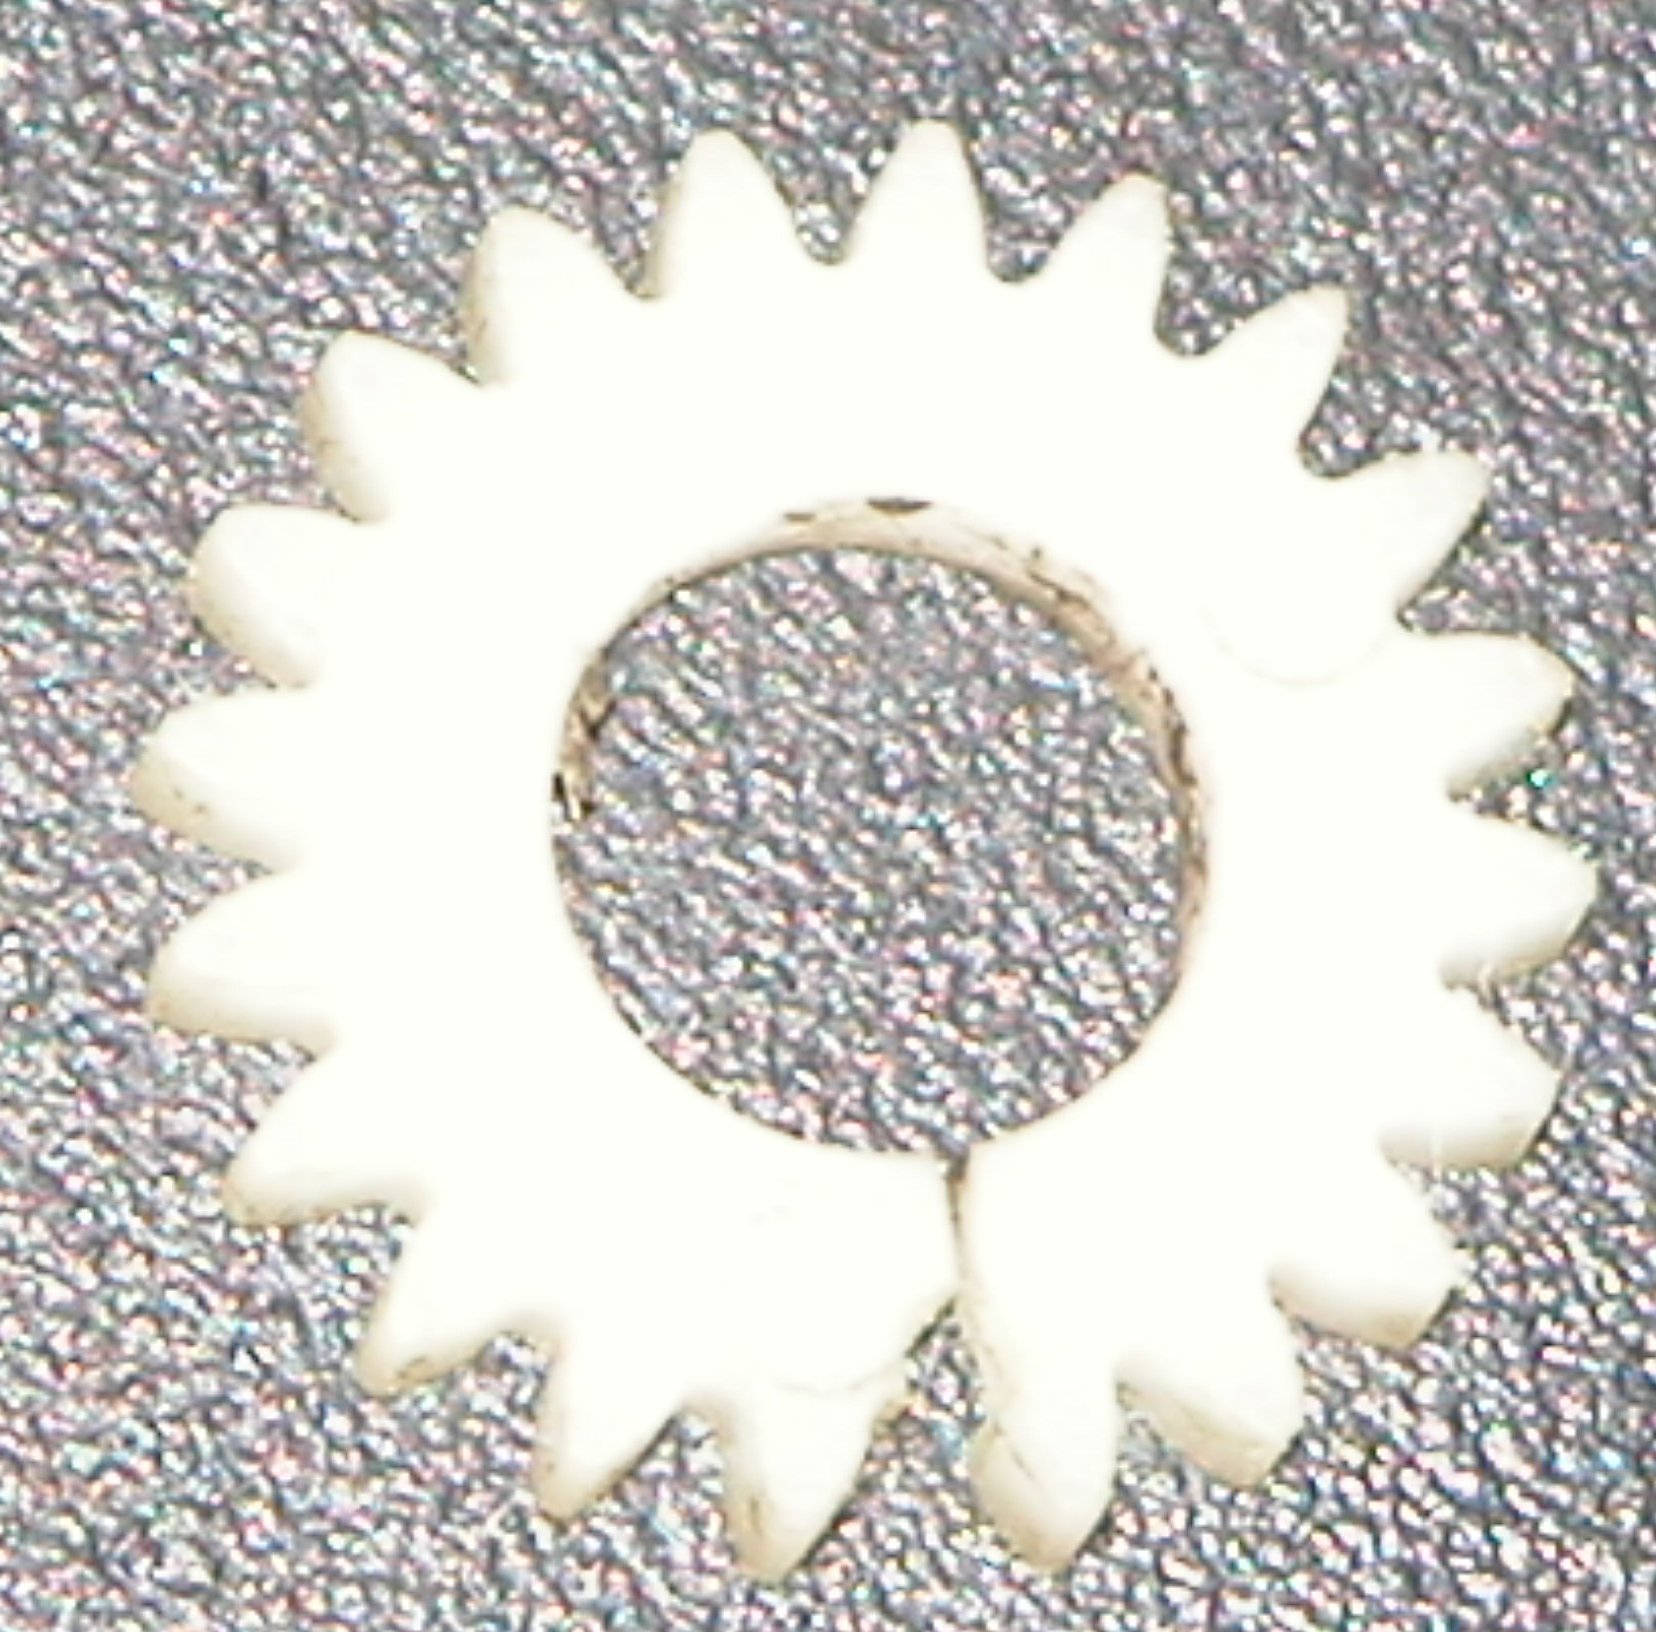 It did operate but not worth a cuss -- it spitted and sputtered and sometimes I could tell the motor was running and the wheels not turning. So, I put on my engineer hat and took it apart. The problem I found almost made me give up on it and just use it for a display. The gear on each axle that actually transmits the turning force to the wheels was split radially, probably from age causing it to become brittle. The split is visible in the photo at the bottom of the gear. Because of this split, the gear was slipping around the axle and not consistently turning it. My first thought was to email customer support at Bachmann and see if I could buy the gears. I soon found that this was an older model and they didn't sell that gear. To make a long story short, after a diligent search, I found a site that sells almost any kind of plastic gear one could want. I found one close to the same as what I needed but not quite. I bought it but it had a hub on it that I didn't need or want and it was thicker than the original one. Undeterred, when the gear was delivered, I took it out to my trusty bench grinder and first ground the hub down to a dimension the handcar could tolerate. Then I flipped the gear over and ground down the thickness so that it would fit in the recess in the handcar bottom. After some greasing and trimming a little on the plastic housing, it began to operate smoothly without binding. Success! I had now recovered my $46 investment.
The Problem: Bachmann 4-6-0 Drive Gear Split
The Solution: Replace the gear. The gear was split radially, again apparently because of aging of the plastic making it brittle. I found a replacement gear online at the site listed on my "Info Links" page. The number of teeth on the gear, the outter diameter, the gear thickness (face width), and hub size all were right on the money. However, bore diameter was slightly too large, allowing the gear to spin freely on the axle. I knew that I had seen a couple of solutions online to the issue of the gear spinning on the axle. One was to just glue the gear at the knurling on the axle. Other solution was to put a pin through the axle. I opted for the pin approach. My experience in drilling the axle and installing the pin is detailed on my lessons learned page under the Ebay lesson. The pin worked very well.
• Locomotive Smoke Door •
The Problem: Smoke door latch broken
Solution: Glue on a new latch. When I first got our Bachmann 4-6-0 Mountaineer train set, I read the brief directions in the included literature (looked like a comic book) that to get the smoke effect going, you had to open up the front of the locomotive. There was no mention of flipping a latch anywhere. I tried to open the front end without success. The ungifted part of me finally decided that paint from the factory had the door stuck shut and I would have to pry it open, which I did with the blade of my trusty pocket knife. I didn't realize at the time that I broke the latch which was till unseen to me. I was proud of my grand logic and reasoning that had provided success in gaining access to the smoke on/off switch. It wasn't until well later when the front door kept flopping open while the train was running that I realized I had screwed up. Oh well, no matter. I got out my handy craft knife and cut a small piece of plastic from some left over stuff I had and glued it to the place where the latch had been broken off. It is a little tricky getting the piece glued in place but a little patience will be rewarded. Be sure to let the glue dry at least overnight before trying the latch -- yes, I broke it again the first time by trying it before the glue was hard enough.