Building a Garden Railroad
Part 2, Track
Getting the Train and Track
I learned a lot about G-Gauge railroad tracks, mostly after I had already ordered my Bachmann train set. It was surprising for me to learn that Bachmann track is made of steel and therefore is not suitable for outdoor use. It is said that it will rust in a matter of days outside. Upon learning this, I came to the realization that I wasn't even certain what type additional track I had ordered and if it was the best for outdoor use. I soon found that the Aristo-Craft track I had ordered was brass and would be acceptable for outdoor use. However, the guy at my local hobby shop informed me that, actually, stainless steel track was better outdoors because it would not oxidize on its surface as quickly as brass track. I took that advice with a grain of salt at the time though because I had no experience with either and I feared that my hobby shop guy was talking up the stainless steel track because that was all he had for sale. I decided to let the straight brass track I ordered continue on. It wasn't enough for the entire routing anyway. It was just some that I ordered while ordering the train set. I would still have to order more to supplement that, particularly now that I knew I would not be able to use any of the track that comes in the Bachmann set. I did buy a few five foot pieces of stainless steel from my local hobby shop to be able to compare the two when my straight brass track arrived. I also decided that I would only order stainless steel for the curved track I needed. Stainless now costs only about 25% more than brass and I decided it likely was worth the additional costs. I really wanted to go as much toward low maintenance as possible because I didn't want to spend my time with aggravating starts and stops of the train, nor did I want to spend a lot of time cleaning the track.
The next issue was what radius of curve track to order. I knew my local guy didn't have any wide radius curve track so whatever I got I would have to order. At first I misread a recommendation on the internet regarding minimum radius -- I read that a minimum of 6' would be required. I began to consider ordering 12.5' diameter curves so as to have more than a 6' radius. It turned out that Charles Ro, from whom I ordered the train set, did not have 12.5' diameter curves in stock and I didn't know how long it would take to get it. As I looked closer I noticed that some suppliers called the 10' diameter curves "wide radius" so I looked closer at various recommendations and decided 10' diameter (5' radius) curves would be fine. So I did my usual internet search and found that the cheapest I could find 10' diamter curves was from wholesaletrains.com (Lantz Hobby Shop). Their website showed that they had it in stock for "next day" shipment. When I didn't get a notice of shipment from them within 3 days, I called to inquire why it had not been shipped. The young lady said that they only had six pieces in stock and had to restock before they could ship the 26 pieces I had ordered. I was disappointed at this knowledge. I thought they should at least have emailed me to let me know their "Next Day" shipping estimate would not hold in this case. However, I resolved to be patient and get the curved track an estimated week or so later (total of two weeks from order date).
On 25 October the Bachmann "Mountaineer" train set was delivered, along with the straight brass track I had ordered with it (20 LF). I set up the train indoors on the Bachman track from the set and ran it around a few times. It seemed to work very well. I still could not run the new train outside though because I had not received the curved track sections I ordered.
Preparing to Lay Track
I believe it was fortunate that I had to wait a couple of weeks for all my track pieces. During the time I was waiting, I was forced to spend extra time on preparing the track base as there was nothing else to do.
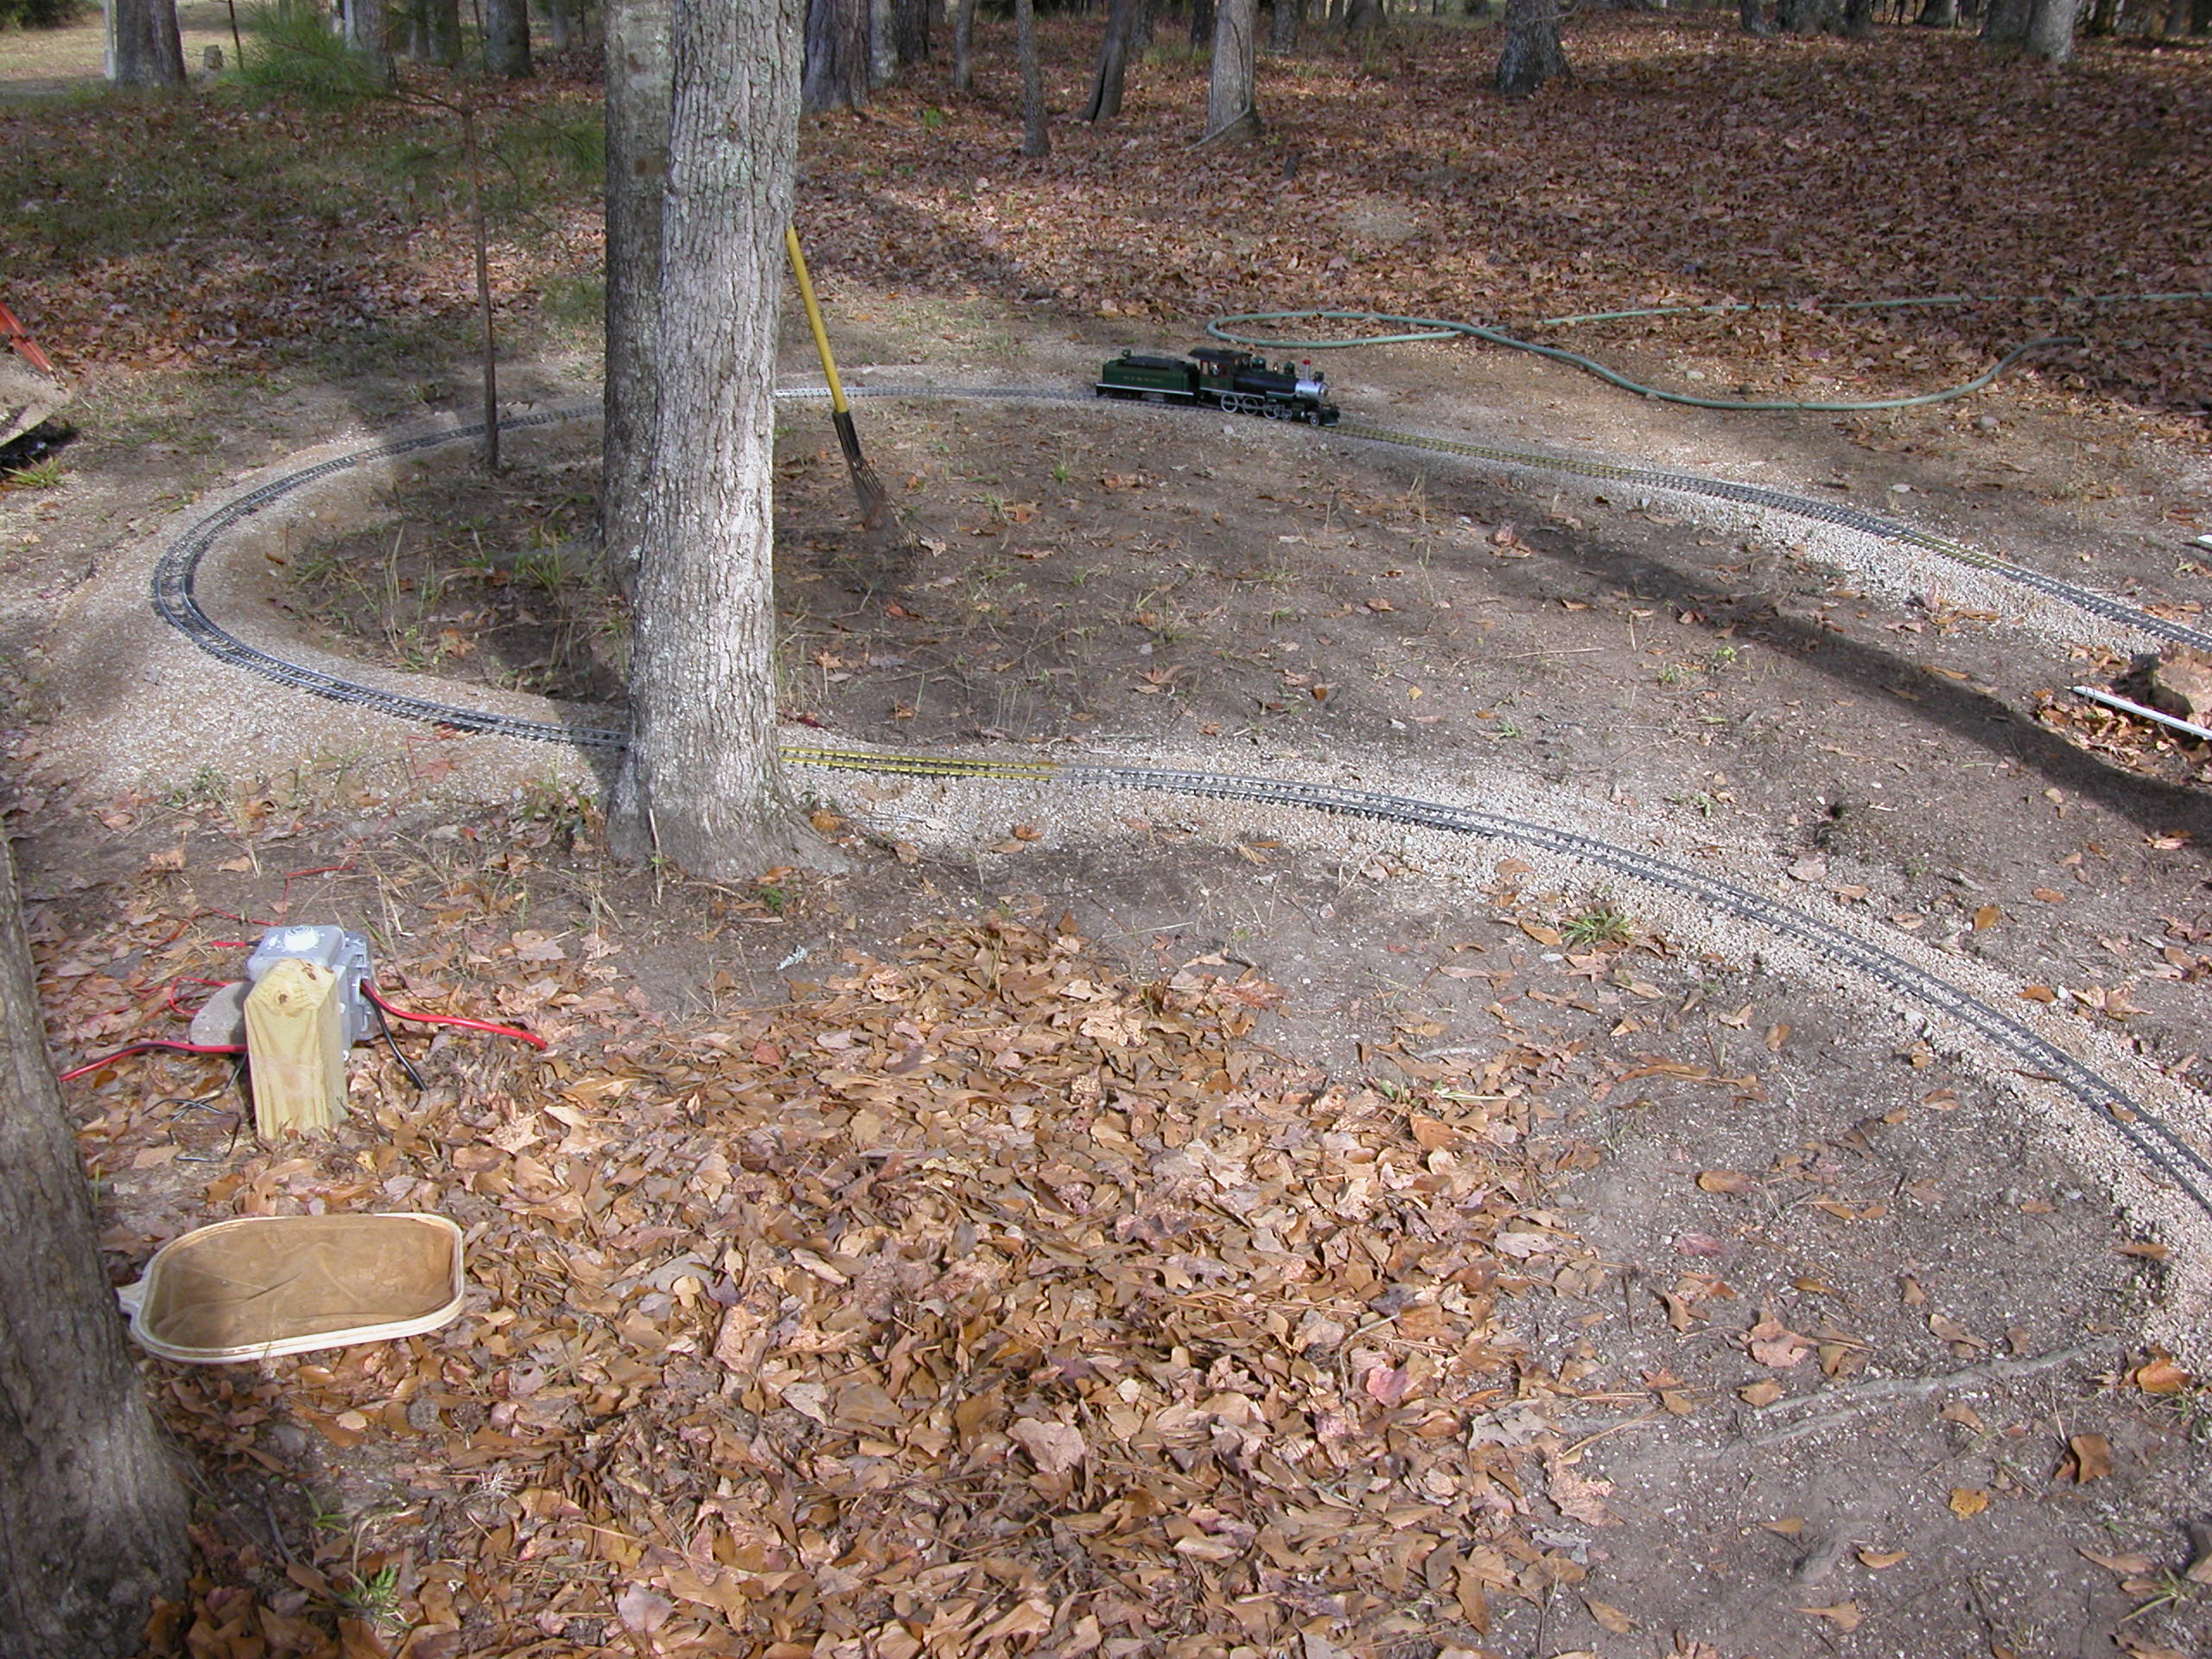
 I primarily used "8910" crushed stone for my track base. This is a crushed limestone material that is available locally. "8910" is an American Association of State Highway and Transportation Officials (AASHTO) designation for the material. It is mostly all smaller than 1/4" size but includes some "fines" that are claylike particles to serve as a binder. When it gets wet, the small percentage of clay particles tend to bind together. Then when it dries, it is a little like concrete, stuck together. You can see in the photo, the light gray colored 8910 crushed stone base. I saw a couple of articles on the internet about putting down treated wood on which to lay the track, or bender board and other things. I rejected those ideas as unnecessary, particularly in my climate. In Alabama, we don't have to worry much about frost heave. And, my site was underlain by a natural clay gravel that was well compacted. All I had to do was strip off a thin layer of topsoil and organic matter, spread the 8910 and my base was ready.
My biggest concern as I prepared the track base was having grades too steep. I knew from my initial survey of the site that I had about a foot of fall from end-to-end of the area where I planned to lay the track, and my track area was about 30 feet from end to end. If I had a 1 foot fall in 30 feet, that would be a 3.3% grade which is about the maximum I should have. However, if I just laid the track on the natural lay of the ground, going from side-to-side of my area (instead of end-to-end), I had an area where there was 12" of fall in about 15 feet or 6.6%. My research on the internet indicated that grades should be limited to a maximum of 4%, preferably less. So, I had to do something about that side-to-side fall, either lower the upper side or raise the lower side. The fact that the upper side had to cross the streambed made it clear that my only option was to raise the lower side. Many railroaders raise their Garden railways anyway and keep them off the ground, often by using a system similar to that created by Paul Race. I like this flexible roadway method but it was going to be way more expense and work than I really wanted to invest.  I had plenty of the 8910 material so I decided to just build up an embankment on the low side using the 8910 (see lower left corner of photo).
I was also a little concerned about locating exactly where the planned route of the track was. I had my drawing that I had done to scale for the 10' diameter curves and I was nailed down as to where the straight section on the upper side had to go because I already had my concrete bridge done crossing the stream. I had to estimate where the center point of the radius of my turns would be. I could have set up a transit and turned an exact 90 degree angle from the starting point and measured 5' to the radius point, but that seemed like overkill given that the width of the embankment I was building provided a little slop in the horizontal location. So, I just continued eyeballing the angle and measuring 5' to the radius point on each end of each curve. Also, since these embankments were pretty easy to build, I could adjust later when laying track, if necessary. I built up the lower side about 5" using the embankment so that cut my side to side fall down to about 7", or a 3.8% grade at the steepest part. That barely met my criterion for a maximum grade of 4%.
Once I had the embankment built along the lower side of the track routing, it became intuitively obvious that I had built in a drainage impediment. So that became my next hurdle -- some method to allow drainage through the area. I considered some alternatives:
(1) A box culvert made of concrete. This seemed like a lot of trouble.
(2) A culvert made from 4" PVC pipe. This would work but lacked creativity.
(3) Some sort of bridge. I decided this option would provide plenty of drainage capacity and presented an opportunity to get creative in construction.
Concurrent with track base preparation time, I was spending a lot of time searching through Ebay for G Scale stuff and had seen some 1/2"x1/2" redwood stock up for bids. I put in a reasonble bid on some and got it. The seller shipped it quickly so I had it within a few days of bidding on it. When I bought it, I wasn't even sure where or if I would build anything with it, but the timing was perfect to use it for construction of a bridge. I decided on a trestle. I searched the internet (I do that for almost everything) and found a nice little plan for constructing a trestle. This detailed guide to building a trestle is, again, from Paul Race for Family Garden Trains. I made the little template for assembling the trestle bents, just as his instructions outlined. That made assembling the bents a piece of cake. If you need to build a trestle, I can highly recommend these instructions and step-by-step details.

I made a footing for each of my trestle bents by burying a patio paver where each bent would bear. You might notice from the photo also, that I used some stones at the ends of the embankments on each side to help retain the 8910 material. Rain washed the 8910 down into the cracks and crevices of these stones and made a nice looking and stable embankment. The track across the trestle shown in the photo is not hooked up, it's just laying across the trestle for effect. I eventually used some small florist's wire to wire the cross ties down to the trestle members to assure that the trestle would stay in place for the long haul. I adjusting the trestle elevation slightly to give it a downhill fall, still trying to spread the side-to-side fall over a long a stretch of track as possible. Every little bit helps in reducing the steepness. The completed trestle, installed near the low point of the natural ground, provided a wide open area for drainage from the entire railroad layout, as well as providing a nice, authentic element to the overall appearance.
Laying the Track
With the trestle down, the concrete bridge done and the track base done everywhere else along the planned route, I was completely ready for track delivery. The 26 pieces of 10' diameter track arrived on 10 November 2011. A red letter day for progress on the Mulberrytown Railroad. The 26 pieces of curved track including shipping cost me $645, quite a blow to my pocketbook. I already had all the straight track I would need from the 20' of brass I ordered with the train set and 15' of stainless steel I purchased locally. Track laying went very quickly or at least it seemed it did. I had very few problems. I started with the long straight section across the concrete bridge and continued in a clockwise direction from there. All of my track was Aristo-Craft (except the Bachmann pieces that I couldn't use outside), so it all had the little set screw type attachment. I put in screws at every joint. I wanted to minimize the possibility of having electrical connection problems with the track and I only wanted to hook it up once and for all (I thought). I didn't have much problem with the screws but they are so tiny compared to my big ole 60 year old fingers that I often dropped them and couldn't find 'em. I also found that I had to get my head right down at track level and make sure I had the rail joiner lined up with the hole. I had to see the screw going in the hole or I usually couldn't get it started right. Of course, for a guy that wears glasses, getting your head down in that position plays havoc with seeing through bifocals but somehow I made it work. Fortunately, the tiny screws would stick enough to the hex head driver to allow me to put the screw on the driver and use it to stick it in the hole. However, if I got any dirt or trash on the socket of the screw, it wouldn't stay on and would, therefore, require use of a few curse words in frustration as the screw would almost get to the hole and then fall off the driver. After several iterations of cursing the screw, the driver, the track and anything else in the vicinity, I would ultimately just get a new screw and it would stick on the driver better.
I did have to do some adjusting to the alignment of my preplaced base material in a few places. A couple of places my estimated angle of curvature was a little off but, no big problem, I just took material from one side of the embankment and placed it on the other side to realign the embankment a few inches. I even had to adjust the length of a straight section from a planned 4 feet to 5 feet when it appeared that the track alignment was going to miss my beautiful trestle. I learned that it would be very difficult for your track alignment to end up like a theoretical drawing would show it for the following reasons:
(1) It would be a fluke if you happened to get the pieces attached together at exactly the theoretical angle. Only a 32nd of an inch off transverse to the track alignment (a small gap in one but not both rails) is magnified and the other end of a, say, 5' piece might be off by a couple of inches.
(2) Any slope to the track in a direction perpendicular to the alignment will cause it to head in a slightly different direction.
(3) Only a perfectly level base with no variations in either direction would be perfectly aligned according to theoretical.
Those are probably as much excuses for why my layout didn't follow my theoretical layout as anything. Even with those issues though, the track went together fairly easily. I was pleasantly surprised when I got back around to connect up to the straight section on the other end, I was pretty close to using a round one foot piece to close the loop. I did have to do a little adjusting to the alignment at a couple of the curves to get that close but I was glad to see it come out that way.
After getting all the track in place, screwed together, reasonable level (where it was supposed to be level) and even grades instead of ups and downs, I sprinkled ballast over the track to get it between the ties. This sounds more difficult than it was. I just sprinkled the 8910 on the track and used my fingers in a sort of raking motion to rake it along the track alignment filling voids as I went. After doing this along the almost 100' of track, I had almost worn the skin off my fingers but it looked good. As a final step, I used a water hose to sprinkle over the entire length of track to settle the ballast between the ties and lock it all in place.

 Then came the BIG MOMENTOUS OCCASION -- running the train for the first time.
I was almost giddy with excitement at the prospect of finally running the train on the track.
The train actually ran all the way around the track the first time! I didn't make it for a second round (reverse super-elevation problem disccussed in lessons learned) but at least I had demonstrated that it had the potential to consistently go around. I had a few minor problems that will be addressed separately but, in general, it worked very well. With the track all done, I could consider that I had a "Garden Railroad" that would now begin a continuing evolution for what I hoped would be a long time.

Continue to Maintenance page -->